
Set Up a Google Merchant Center Account: Step-by-Step Guide
Introduction to Google Merchant Center
If you sell products online, Google Merchant Center is the starting point for getting them in front of buyers. Not through ads alone — through the entire Google ecosystem: Search, Shopping tab, Images, YouTube, and Maps.
The numbers make the case clearly. Google Shopping Ads drive 85.3% of all clicks on Google Ads and Shopping campaigns combined, and account for 76.4% of all retail search ad spend in the US. Around 36% of shoppers start their product search on Google — making it the second most common starting point after Amazon for product discovery. For ecommerce brands, this isn't optional territory: on average they allocate 80% of their Google Ads budget to Shopping campaigns.
And yet the gateway to all of this is a free tool. Setting up a Google Merchant Center account costs nothing. The account itself is free — you only pay when you run paid Shopping or Performance Max campaigns through Google Ads. Free product listings on the Shopping tab are available to any merchant who submits a compliant feed, with no ad spend required.
This Google Merchant Center account setup guide walks through everything needed to set up a Google Merchant Center account correctly: from creating the account and verifying your website, to configuring shipping, building a product feed, and avoiding the most common approval issues. Whether this is your first ecommerce Merchant Center setup for beginners or you're migrating to Merchant Center Next, the steps here apply.

What is Google Merchant Center
Google Merchant Center is a free platform where retailers upload, manage, and optimize their product data so it can appear across Google's surfaces. Think of it as the bridge between your product catalog and Google's advertising and organic shopping features — the foundation of any Google Merchant Center for online store setup — without a Merchant Center account, your products simply don't appear in Google Shopping results, regardless of how well your website is optimized.
When you create a Google Merchant Center account and submit a product feed, Google uses that data to generate Shopping ads, free listings, and local inventory ads. Every product detail you provide — title, price, image, availability, description — becomes the raw material Google uses to match your products to relevant searches.
Since August 2024, all merchants have been migrated to Merchant Center Next, the updated version of the platform. The interface has changed significantly: "Feeds" are now called "Data Sources," "Diagnostics" is now "Needs Attention," and the overall structure is cleaner and more automated. If you're setting up a new account today, you're working in Merchant Center Next by default.
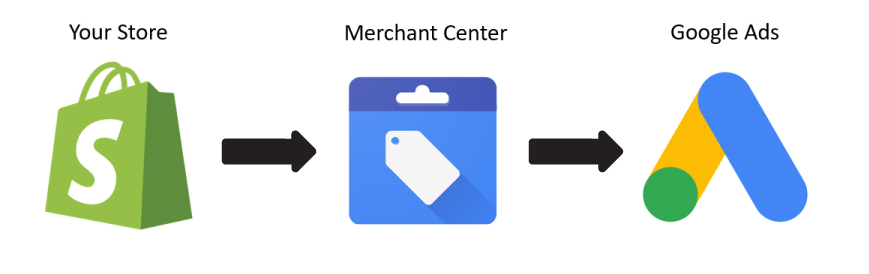
How Merchant Center connects to Google Ads
Merchant Center and Google Ads are separate platforms that work together. Merchant Center holds your product data. Google Ads holds your campaign budgets, bidding, and targeting. To run Shopping or Performance Max campaigns, you need both — and they need to be linked.
The link is straightforward: you authorize the connection from within either platform, and from that point Google Ads can pull product data directly from your Merchant Center feed to generate ads automatically. You don't build Shopping ads manually the way you build Search ads — Google assembles them from your feed data based on what a searcher is looking for.
This also means feed quality directly determines ad quality. A product with a vague title, missing attributes, or an outdated price will either underperform or get disapproved entirely. Dennis Moons, founder of Store Growers and a Google Ads expert with over 12 years of experience managing more than $5 million in ad spend, puts it plainly: feed optimization is where most of the leverage in Shopping campaigns actually sits — not in campaign structure or bidding alone.
Connect Merchant Center with Google Ads
Merchant Center holds your product data. Google Ads runs your campaigns. To use one for the other, you need to link them — and the process takes about two minutes once you have the right access levels in place.
Link Google Merchant Center to your Google Ads account
Before starting, confirm that you have Admin role in Merchant Center and Administrative Access in Google Ads. Both are required — without them, the linking request either can't be sent or can't be approved. According to Google's official documentation, this applies whether you're linking manually or via API.
To link Google Merchant Center to Google Ads manually: go to Settings in Merchant Center, select "Linked accounts," find the Google Ads section, and enter your Google Ads customer ID (the 10-digit number in the top right of your Google Ads account). Google Ads will receive a link request that needs to be approved by an admin on the Google Ads side. Once approved, product data from your Merchant Center feed becomes available for campaign creation immediately.
One practical note: if you're an agency managing a client's accounts, you'll need Admin access to the client's Merchant Center — not just Standard access. Standard users cannot link Google Ads accounts. This is a common point of friction when onboarding new clients, and it's worth confirming access levels before starting the setup process.
Enable Shopping and Performance Max campaigns
Once the accounts are linked, you can create Shopping or Performance Max campaigns directly in Google Ads. Performance Max is now the primary campaign type Google recommends for product advertising — it runs across Search, Shopping, YouTube, Display, and Discover simultaneously, using your Merchant Center feed as the product data source.
For a feed-only Performance Max campaign (no additional creative assets), Google assembles ads automatically from your product titles, images, and descriptions. This is the fastest way to get products live, and it works well for accounts that don't yet have video or display creative ready. The tradeoff is less control over where and how ads appear — Performance Max optimizes toward conversion value by default, which requires accurate conversion tracking to work correctly.
Track clicks, revenue and ROAS from Shopping traffic
Conversion tracking is what connects ad spend to actual results. Without it, Google's Smart Bidding has no signal to optimize against, and your ROAS data in Google Ads will be incomplete or missing entirely.
The standard setup: implement the Google Ads conversion tag on your order confirmation page to track purchases and revenue, then import those conversions into Merchant Center as key events. For Shopify stores, the Google & YouTube app handles this automatically. For WooCommerce and other platforms, Google Tag Manager is the most reliable implementation path — it keeps tracking independent of theme updates and plugin changes.
Once conversion tracking is in place, ROAS data appears at the campaign, ad group, and product level in Google Ads. Combined with Merchant Center's product performance reports, this gives you a full picture: which products are getting impressions, which are converting, and where budget is actually producing return.
Step-by-step: Set up a Google Merchant Center account
The actual process to set up a Google Merchant Center account is straightforward — most merchants complete the initial setup in under an hour. The steps below reflect the current Merchant Center Next interface, which all new accounts use by default.
Create your account and choose where you sell
Go to merchants.google.com and click "Sign up for free." You'll need a Google account — the same one you use or plan to use for Google Ads. During signup, Google asks three questions upfront: your business name, your country, and whether you sell online, in-store, or both. This selection determines which features appear in your account — online-only accounts won't see local inventory options, while brick-and-mortar accounts get access to Local Inventory Ads setup.
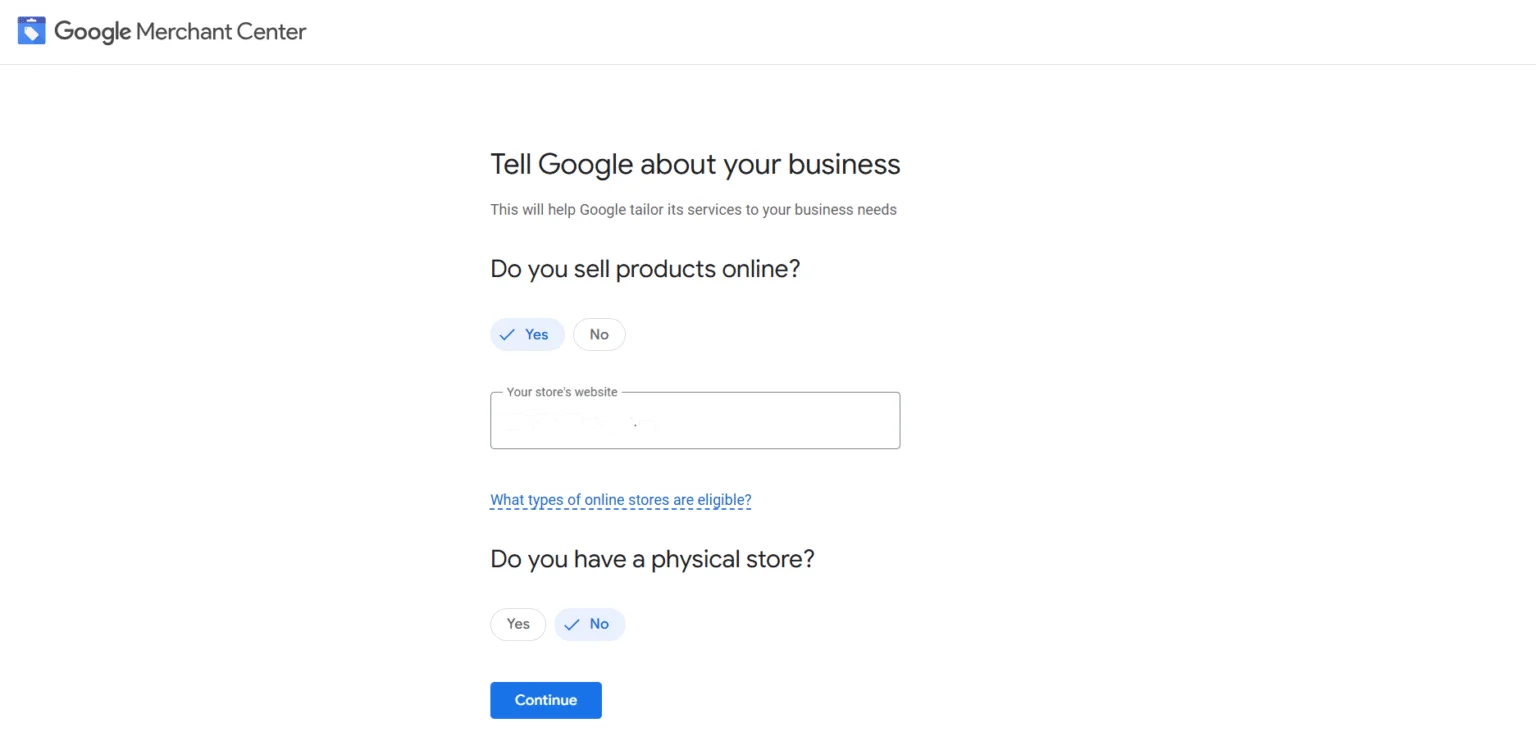
For most ecommerce businesses, selecting "online" is correct. If you run a hybrid model — selling both through a website and a physical location — select both from the start. Changing this later is possible but requires reconfiguring several settings, so it's worth getting right the first time.
After confirming your business type and agreeing to Google's Terms of Service, your account is created. At this point it's empty — no products, no verified website, no shipping settings. The next steps fill each of those in.
Add, verify and claim your website URL
Verifying your website in Google Merchant Center is a two-part process: verification proves you have access to the site, and claiming gives your Merchant Center account exclusive rights to use that URL for product data. Only one Merchant Center account can claim any given URL — if a previous agency or developer claimed your domain and never released it, you'll need to request that they unclaim it before you can proceed.
Verification methods available in Merchant Center Next include adding an HTML tag to your site's header, uploading an HTML file to your server, using Google Analytics (if the GA4 tag is already on the site), or using Google Tag Manager. For merchants without developer access, the Google Analytics method is the fastest — if GA4 is already installed, verification happens automatically without touching any code. This makes it the go-to option for a Merchant Center account setup without developer involvement.
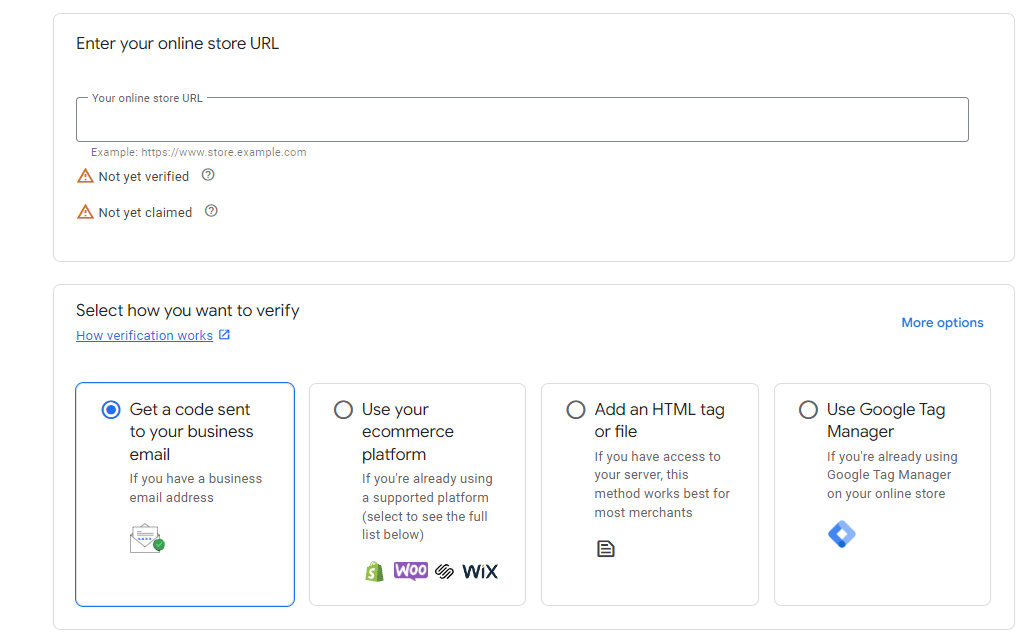
One requirement that trips up a lot of new merchants: your website must be on HTTPS before Google will verify it. An HTTP site will fail verification. If your site still runs on HTTP, fixing this with an SSL certificate is the prerequisite step — not something to do after setup.
Complete business information and customer support details
After verifying your website, Merchant Center asks for business information: legal business name, address, customer service phone number or email, and links to your returns and refund policy pages. These details appear to customers in Shopping results and are cross-checked against your website during Google's review process.
According to Google's policy requirements, your website must have visible contact information, a clear returns and refunds policy, and secure checkout. Merchants who skip these pages or add them after submitting products often see their accounts flagged for misrepresentation — one of the most common reasons for account suspension. Getting this right at setup is far easier than fixing it after disapprovals start appearing.
Configure key settings for stores
Getting products into Merchant Center is only part of the setup. Shipping and returns settings determine whether your listings show key trust signals — and whether customers can find accurate fulfillment information before clicking through to your site. According to Google's own best practice guide, shipping speed and cost are two of the most common reasons shoppers abandon their carts. Getting these settings right directly affects both click-through rates and conversion rates.
Shipping settings and delivery times for customers
Shipping settings in Merchant Center apply across all your Shopping ads and free listings. You configure them under Shipping and returns → Shipping services, where you set up one or more shipping policies covering delivery countries, carrier rates, and estimated transit times.
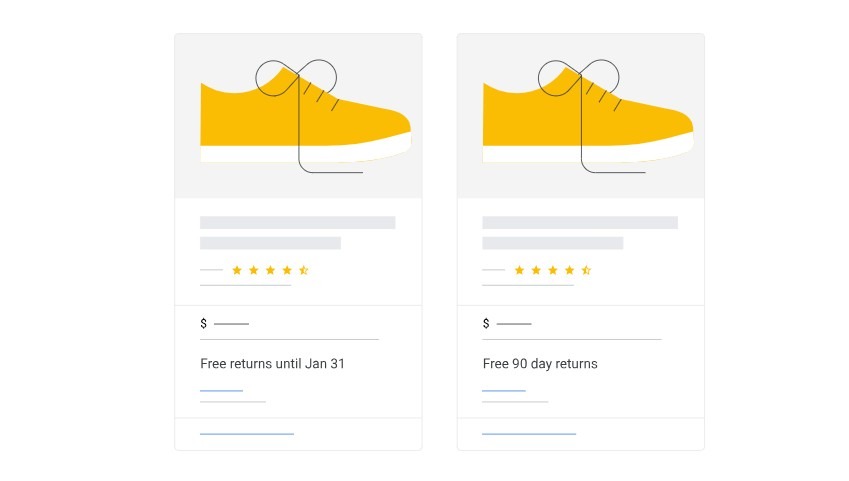
Google supports up to 20 different shipping policies per account — useful for merchants offering free shipping above a certain order value, different rates by region, or express delivery options alongside standard. The most impactful setup for most merchants: a free shipping threshold combined with accurate transit time ranges. When your products qualify, Google automatically adds "Fast and free shipping" annotations to your listings — badges that appear directly in Shopping results and consistently improve CTR.
One update worth knowing: as of November 12, 2025, Google expanded shipping configuration options so that any online merchant — not just Merchant Center users — can set shipping and returns policies through Search Console or organization-level structured data. For merchants already using Merchant Center, settings configured in Search Console take precedence over structured data on your site, so it's important to keep both consistent if you use both methods.
For delivery time accuracy, Google uses the sum of handling time and transit time. If that sum exceeds what you've configured in your Merchant Center account, your products won't qualify for fast shipping annotations even if your actual delivery speed meets the threshold. Submitting accurate handling and transit day ranges — not just the best-case scenario — prevents this mismatch and keeps your annotations active.
Returns, refunds and store policy pages
A clear return policy is both a trust signal for customers and a compliance requirement for Google. According to Google's official Merchant Center documentation, your return policy must be on a separate, dedicated URL — not embedded in a FAQ page or terms and conditions. The policy must be accessible without login or signup, and the details in Merchant Center must match exactly what appears on your website.
To configure shipping in Google Merchant Center, go to Shipping and returns → Return policies tab → Add return policy. You'll need to provide the policy URL, select the countries it applies to, specify the return window in days, and define the return method and any associated fees. After submitting, Google reviews the policy — which can take up to 10 business days. If rejected, the reason appears in the Status column and needs to be corrected before resubmitting.
As of March 2025, merchants using JSON-LD structured data for return policies must include the return_policy_country field — a new requirement that specifies which policy applies to which country. Missing this field causes structured data errors that can affect how your return policy is displayed in search results. For merchants selling across multiple countries with different return windows or fee structures, each country needs its own policy entry in Merchant Center.
When your return policy meets Google's requirements, "Free returns" annotations appear automatically on eligible listings — another visibility boost that requires no additional setup beyond getting the policy configuration right the first time.
Add products to Google Merchant Center
Getting products into Merchant Center is where most of the real work happens — and where most of the leverage sits.When you set up product feed in Google Merchant Center, a compliant feed gets your products approved. An optimized feed determines how often they appear, at what cost, and whether they convert.
Choose a product data source in Merchant Center Next
In Merchant Center Next, product data sources are found under Products → Data sources. There are four main options: automatic import from your website (Google crawls product structured data), a scheduled feed file hosted at a URL, a manual file upload (spreadsheet or XML), and direct API integration for large catalogs.
For most small to mid-size stores, the easiest starting point is connecting your ecommerce platform directly. Shopify, WooCommerce, BigCommerce, and PrestaShop all have native integrations or official Google apps that sync product data automatically. Changes to prices, stock levels, or descriptions update in Merchant Center without manual intervention — which matters because products with outdated prices are a leading cause of disapprovals. For stores with hundreds of SKUs or complex variant structures, feed management tools like DataFeedWatch or Channable give more control over how attributes are mapped and transformed before reaching Merchant Center.
Build a compliant product feed for ecommerce
A compliant feed meets Google's minimum attribute requirements — but compliance and performance are different things. According to Google's official product data guidelines, the required attributes for every product are: id, title, description, link, image_link, price, availability, and condition. For branded products, GTIN (Global Trade Item Number) is effectively required too: Google reports that retailers who add correct GTINs see an average 40% increase in clicks, according to Dennis Moons, founder of Store Growers and a Google Ads expert with over 12 years managing more than $5 million in ad spend.
Moons explains the mechanic clearly: "GTINs allow Google to match your product to its database, pull in reviews, compare prices, and show your product in more relevant results." Without a GTIN, Google has fewer signals to work with — the product may still appear, but it will miss out on grouped listings, product ratings, and price comparison features that drive the most qualified traffic.
For custom, handmade, or vintage products without GTINs, set the identifier_exists attribute to "false." Leaving it as the default "true" while not providing a GTIN causes warnings in Merchant Center that can limit visibility.
Optimize product titles, descriptions and images for Shopping
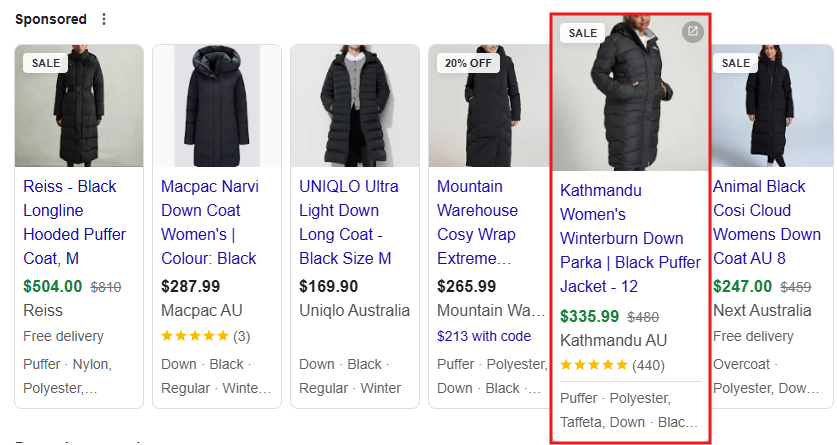
Product titles are the single most impactful feed element for Shopping visibility. According to FeedOps' 2025 product title optimization guide, a compliant title simply gets your product listed — an optimized title determines whether it gets found. The recommended structure for most product types: Brand + Product Type + Key Attributes (color, size, material, gender). For example: "Nike Air Zoom Pegasus 41 – Men's Running Shoes, Wide, Blue, Size 10" outperforms "Running Shoes Size 10" in both impressions and click-through rate because it matches the way people actually search.
One real example from SEO.AI's 2025 GMC settings guide illustrates the impact: a client's feed had no brand or GTIN, generic titles, and non-compliant images. After re-uploading proper images, adding GTINs, and rewriting titles to match actual search queries like "Men's Basketball Shoes" and "Women's Lightweight Running Jackets," their ROAS tripled within a month.
For images, Google's own documentation is direct: use the highest resolution available, avoid promotional text or logos overlaid on product images, and use a white or neutral background for apparel and accessories. Products with high-quality images are more likely to appear for relevant queries — particularly on high-resolution devices where image quality is immediately noticeable.
Diagnostics and troubleshooting
Getting products approved is one thing. Keeping them approved — and catching issues before they escalate to account suspension — is an ongoing process. Merchant Center's Diagnostics section is where this work happens, and checking it regularly is non-negotiable for any active account.
Use Diagnostics to spot disapprovals and item issues
In Merchant Center Next, the Diagnostics tab has been renamed "Needs Attention" — but the function is the same: it shows every product-level issue affecting your account, grouped by severity. According to Google's developer documentation, issues fall into three levels: critical (products removed from all surfaces immediately), error (products at risk of future disapproval), and suggestion (optimization opportunities that don't affect eligibility).
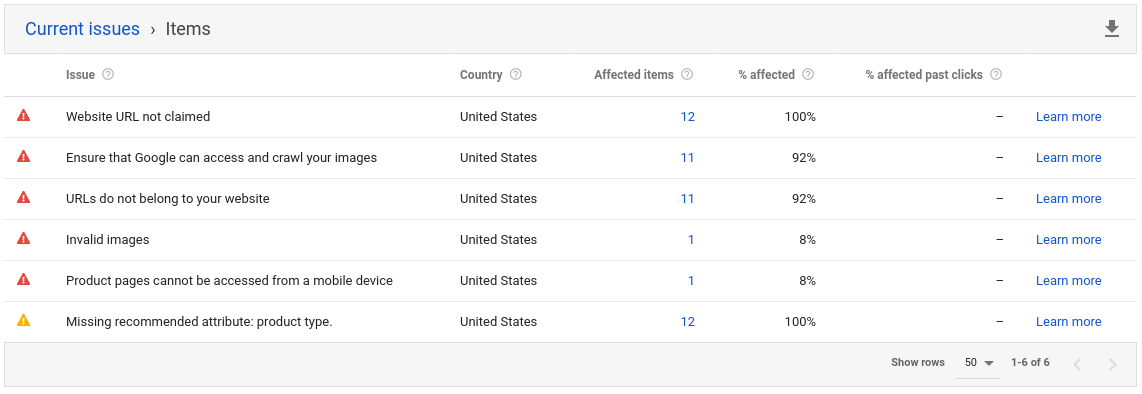
The critical level is what demands immediate action. A red icon next to a product means it's already been pulled from Google Shopping and isn't generating any impressions or clicks. Error-level issues won't remove products immediately but signal that a policy review is coming. John Horn, CEO of StubGroup — a Google Premier Partner agency that has helped over 3,000 clients and generated over half a billion dollars in revenue — advises checking Diagnostics at minimum every two weeks: "Regular monitoring and updating, combined with a clear understanding of Google's policies and requirements, are key to maintaining good standing and avoiding product suspensions."
For accounts with large catalogs, filtering by issue type rather than scrolling through individual products is the fastest way to identify patterns — a single feed attribute error can affect thousands of items simultaneously.
Common setup errors and how to fix them
The most frequent disapprovals new merchants encounter fall into a predictable set of categories. Price mismatch between the feed and the landing page is one of the most common — Google crawls your site independently and flags any discrepancy, even a temporary one during a sale. The fix is ensuring your feed updates in real time whenever prices change, not just on a 24-hour refresh cycle.
Image quality issues are increasingly caught by Google's AI-powered detection system, which has been identifying low-resolution, watermarked, and placeholder images at a higher rate since 2024. Products with images below the minimum size or showing promotional overlays get flagged automatically. Missing required attributes — particularly GTIN for branded products, availability, and condition — account for a significant share of disapprovals in new accounts that imported feeds from third-party platforms without auditing the output first.
To fix Google Merchant Center disapprovals, the process StubGroup recommends follows a clear structure: identify the exact disapproval language in Diagnostics, confirm whether it affects individual items or the entire feed, apply the relevant fix, resubmit the feed or request a manual review, and monitor the status over the following 3–5 business days. Requesting a review before fixing the underlying issue is one of the most common mistakes — Google will reject the appeal and the disapproval remains.
Prevent misrepresentation and other policy violations
Misrepresentation is the most serious policy violation in Merchant Center — and the most common reason for full account suspension rather than individual product disapproval. According to StubGroup's 2026 suspension guide, Google defines misrepresentation broadly: it includes inconsistencies between your feed and website, checkout processes that hide fees, prices that change between the ad and the cart, and return policies that aren't honored as stated.
The warning system works as follows: Google sends an email identifying the violation and gives a set window to fix it. If the issues are resolved within that window, the account is reviewed automatically — no appeal needed. If the window expires without fixes, the account is suspended. From suspension, you have two chances to request a review before a "cool-down" period begins, during which reviews are unavailable entirely. Creating a new account while suspended results in a permanent ban.
To avoid Google Merchant Center suspension, the Google Merchant Center policy checklist is straightforward: ensure your website has HTTPS, a visible contact page, a clear return and refund policy, and accurate product information that matches your feed exactly. John Horn puts it plainly: "Google wants customers to feel confident and informed when browsing Shopping ads. Be honest, be upfront, and be trustworthy — that's the baseline."
Conclusion
Setting up a Google Merchant Center account correctly from the start saves significant time and frustration later. The account is free, the process is well-documented, and the potential reach — across Google Search, Shopping, YouTube, Images, and Maps — is unmatched for any retailer selling physical products online.
The free listings opportunity alone deserves attention. ROI Revolution's analysis across 58 accounts found that free listings have an 18% higher conversion rate than paid Shopping ads (2.07% vs 1.70%) — a counterintuitive finding that reflects the higher purchase intent of shoppers who find products through organic results. For a mid-sized eco-friendly kitchenware brand in California that implemented Merchant Center in early 2025, the impact was measurable within three months: a 42% increase in clicks and a 27% jump in sales, driven by a combination of optimized free listings and targeted Shopping Ads. The starting point was simply cleaning up their product feed — replacing generic titles like "wooden bowl" with specific, searchable ones like "Eco-Friendly Bamboo Salad Bowl – Large, Made in USA."
The revenue potential is just as real for smaller accounts. According to Digitalcommerce.com's January 2026 analysis of a mid-sized ecommerce store, free Merchant listings generated 1,440 clicks and 9,877 impressions over three months — and organic Shopping revenue came in at $4.47 per session, nearly three times higher than organic search ($1.78 per session).

Uproer documented a similar pattern: a health supplements brand earned 3,500 incremental clicks from organic GMC listings within three months of feed optimization — gains that came entirely from fixing titles, descriptions, and compliance issues, with no ad spend involved.
The platform itself is evolving fast. According to ALM Corp's February 2026 analysis, Google is deprecating the Content API for Shopping by August 18, 2026, replacing it with the new Merchant API — which brings improved error handling and better feed management architecture. Feed optimization is increasingly about structuring data to maximize AI effectiveness, not just meeting rigid formatting requirements. Liam Challoner, SEO Director at Alpha Digital, captured the broader shift in his May 2025 analysis: "The more I unpack Google Merchant Centre and its organic influence, the more I realise how important it is for those who want to drive retail performance outside of paid channels." As of May 2025, organic product grids appear in 14% of all mobile searches — and in over 45% of product-specific searches on mobile.
Google Ads Looker Studio templates give you the infrastructure to act on all of this. Free options from Coupler.io, Radyant, and Google's own gallery cover most use cases out of the box.Whether you're running a Merchant Center account setup for small business or scaling an enterprise catalog, the merchants who treat Merchant Center as an ongoing discipline — not a one-time setup task — are the ones who compound their visibility advantage over time.
FAQ
How do I set up a Google Merchant Center account step-by-step?
Go to merchants.google.com and click "Sign up for free." You'll need a Google account, your business name, and your website URL. During signup, choose whether you sell online, in-store, or both. After creating the account, verify and claim your website URL, complete your business information and customer support details, configure shipping and return policies, and submit your product feed. Most merchants complete the initial Google Merchant Center account setup in under an hour.
What do I need before creating a Google Merchant Center account?
You need a Google account, a website on HTTPS with visible contact information, a returns and refund policy on a dedicated URL, and accurate business details including address and customer support contact. For products, you'll need titles, descriptions, prices, images, availability status, and GTINs for any branded items. Your checkout process must be functional and free of hidden fees — Google reviews all of this as part of the Google Merchant Center account requirements during product approval.
How do I verify and claim my website in Google Merchant Center?
After creating your account, go to Business information → Website and enter your store URL. Choose a verification method: HTML tag, HTML file upload, Google Analytics (if GA4 is already installed), or Google Tag Manager. Once verified, click "Claim" to give your account exclusive rights to that URL. Only one Merchant Center account can claim any given URL — if your domain was previously claimed by another account, that account needs to release it first before you can proceed.
How do I link Google Merchant Center to my Google Ads account?
In Merchant Center, go to Settings → Linked accounts → Google Ads, and enter your Google Ads customer ID. An approval request goes to the Google Ads account — once approved by an admin there, the link is active and your product data becomes available for Shopping and Performance Max campaigns. You need Admin access in Merchant Center and Administrative Access in Google Ads to complete this step.
How long does it take for Google Merchant Center to approve my products?
Most products are reviewed within 3–5 business days for new accounts. Free listings typically go live faster than paid Shopping ads. If products are disapproved, the reason appears in the "Needs Attention" section — fix the issue and resubmit to trigger a new review cycle. Return policy reviews can take up to 10 business days after submission. Accounts with prior policy violations may face longer review periods.


