
Google Ads Tutorial 2025: Step-by-Step Guide for Beginners
Introduction: Who this Google Ads tutorial is for and what you’ll learn
Literally anyone can run Google Ads! If you are looking to display your brand or company's ads on Google searches in order to gain visibility from potential customers, but don't know how to, stay with us. The audience for this tutorial includes all business owners who are in search of a Google Ads for beginners guide.
Here, you get a Google Ads step by step guide that is packed with details on how to setup your ads account, and gain knowledge on requirements for a successful search campaign setup, among other information that will give your business the desired outcome.
How Google Ads Works in 2025
Have you noticed tags that read ‘sponsored’ on search results at the top of your browsing results? These links take you to the corresponding websites (landing page) of the individuals or companies and make you more likely to patronize their products and services.
Google Ads operate like auction sales, where advertisers bid to show their ads every time someone searches for something related. But it is not just about who pays the most; your ad is ranked by how relevant it is to the searcher (Ad rank), and how useful your landing page is to them (Quality score).
Let’s get into how to use Google Ads 2025: Open an Account > create Google Ads Campaign > select Ad group > input your desired image and texts in Ads & assets. We'll get to more details on these in this Google Ads tutorial.
Before You Start
Before creating ads, there are four things you must take into consideration:
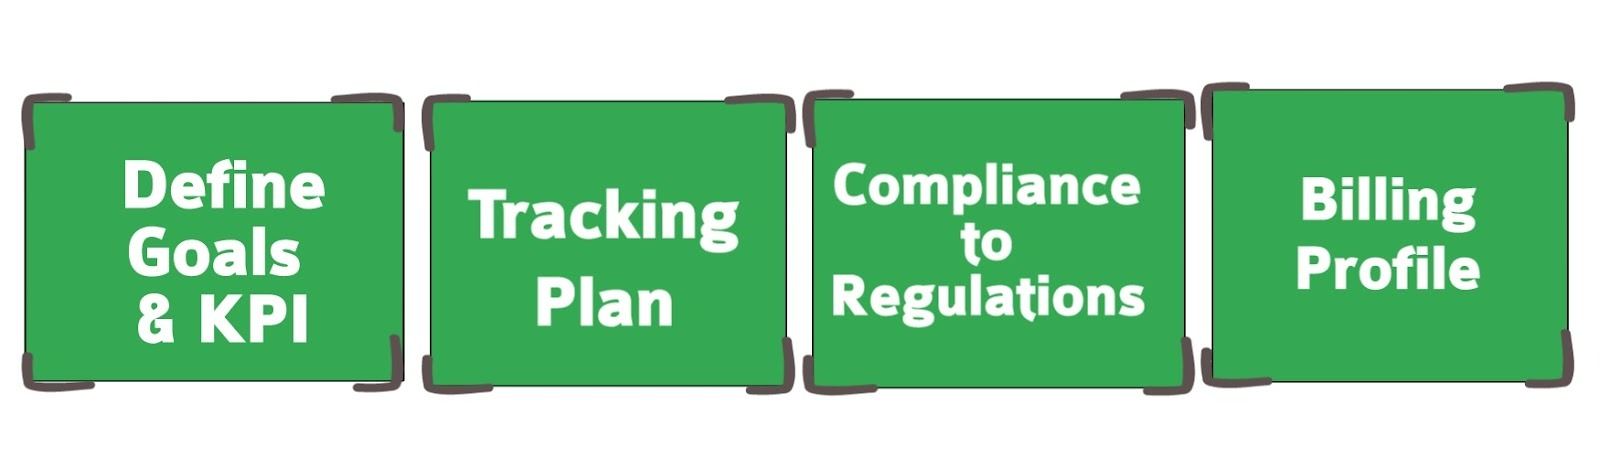
1. Define Goals and KPIs
Ask yourself, “Do I want more sales or just more people visiting my website”? Your answer will determine the kind of ads you run and how to measure their success. If your focus is sales, you will be measuring your Return on Ad Spend (ROAS); and if you are after leads, you will need to know the Cost Per Action (CPA).
CPA tells you the average cost of leads taking a specific action on your page like filling a form or watching a video, while ROAS tells you how much revenue you earn for every dollar spent.
2. Conversion Tracking Plan and Measurement
A conversion tracking plan is how you measure what happens after somebody clicks on your ad. In 2025, the best practice is to use Google Analytics 4 (GA4) with an enhanced conversions setup. This setup allows for Google Ads bidding strategies and in turn lets you weigh and compare Maximize Conversions vs tCPA benefits to determine which approach best aligns with your campaign goals.
3. U.S. Compliance Checklist
To advertise in the U.S, you will be mandated to abide by the guidelines of bodies like the FTC, CCPA/CPRA, HIPAA (if you’re in healthcare), and TCPA if you use call ads.
4. Billing and Payments
Google Ads supports credit cards, ACH transfers, and invoicing for larger accounts. Getting this right from the start avoids later complications and ensures smooth running for your ads.
Set Up Your Account Correctly
Now, you've got to setup Google Ads account where you will manage billings and campaigns. Take the following steps to create your account:
Step 1
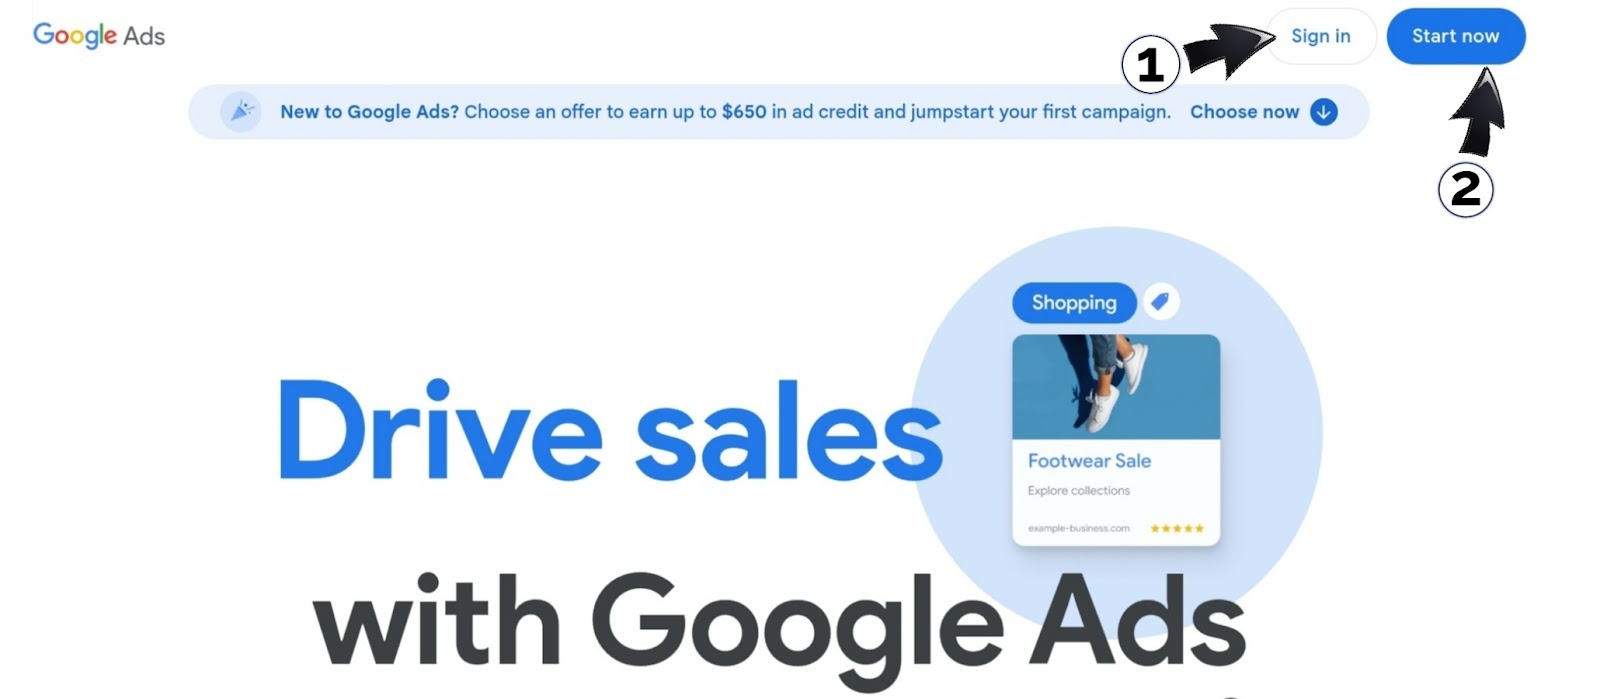
To get started, open Google Ads on your browser and sign in to Google with your Gmail address. You will be prompted to create a “New Google Ads account”.
Step 2
Skip any attempt to create a campaign for now, select “Leave campaign creation”

Step 3
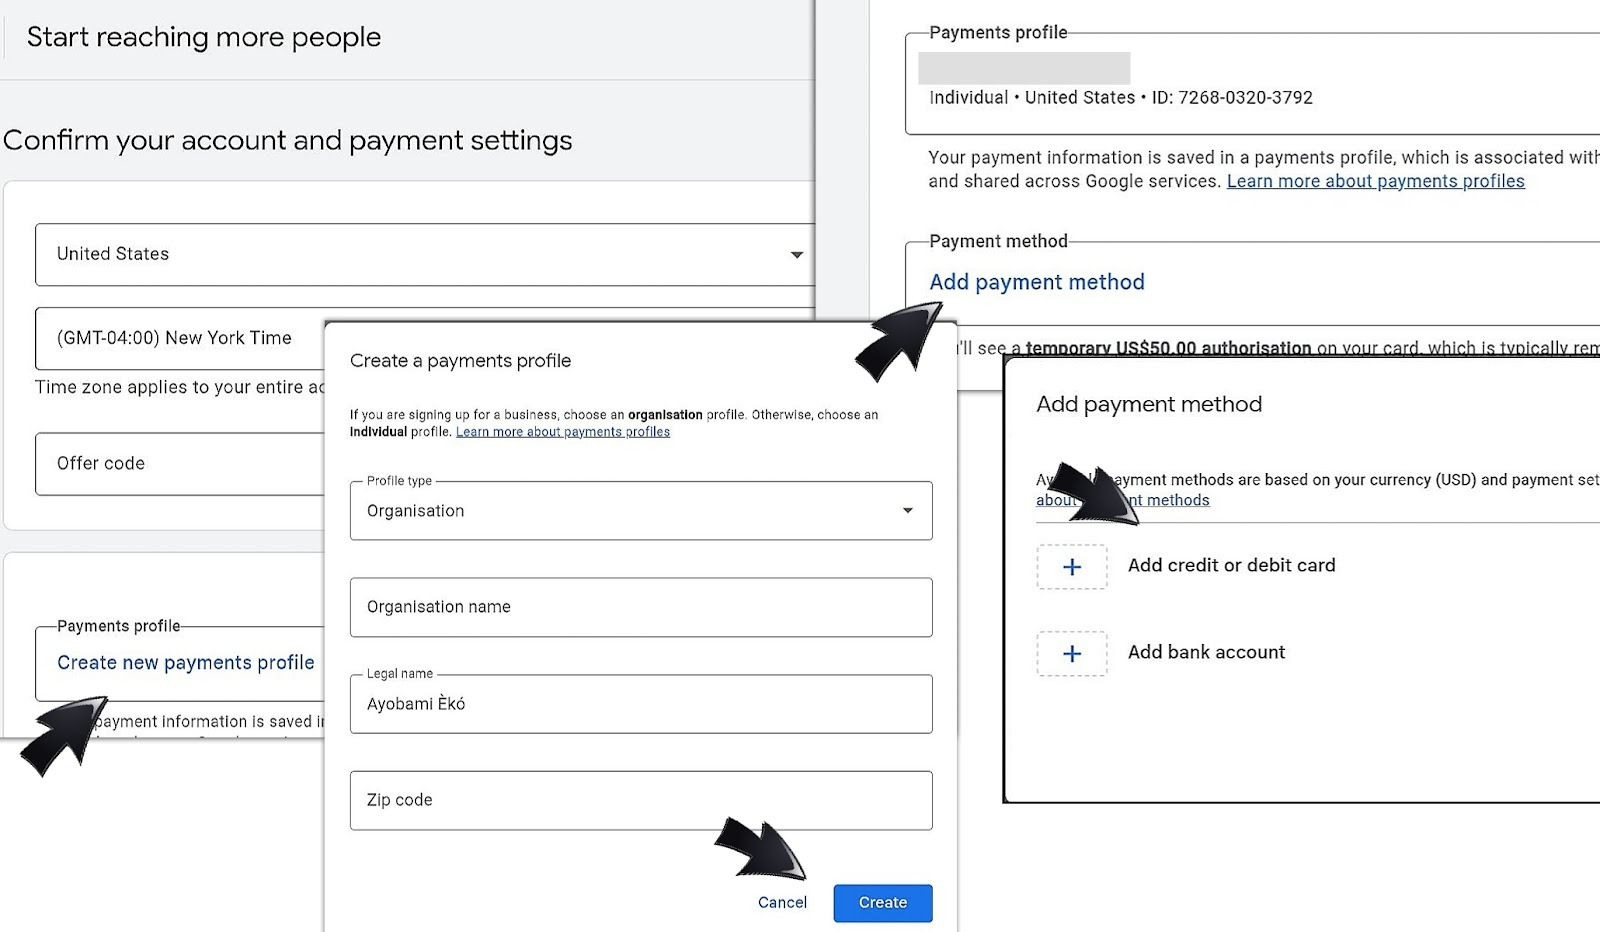
Fill-in your billing country, time zone and currency and click “Continue”.
Step 4
Click on “Create new payment profile”, fill-in the next set of details and click “Create”.
Step 5
Add your payment method. If you select “card”, you will provide the card details and save them.
Step 6
You may be required to fund your account with a minimum of $10. The money will be used for running your ads later. Click on “Add manual payment amount” and type-in the amount and click “continue”.
Step 7
After payment, agree to the terms and click “Submit”. Then click “Continue to your account”. You will see your account details and the money you added.
In case you have to manage multiple businesses, you should follow the same steps to create a Google Ads manager account (MCC) instead. Think of it as a “master account” that allows you to link and manage many individual accounts in one place.
Billing Profile, Thresholds, and Currency
Your billing/payment profile is where you add your payment method and fund your ad campaigns. If your account is set up as instructed above, then your billing profile is set.
You can always access and edit your Billing profile from the Billing icon
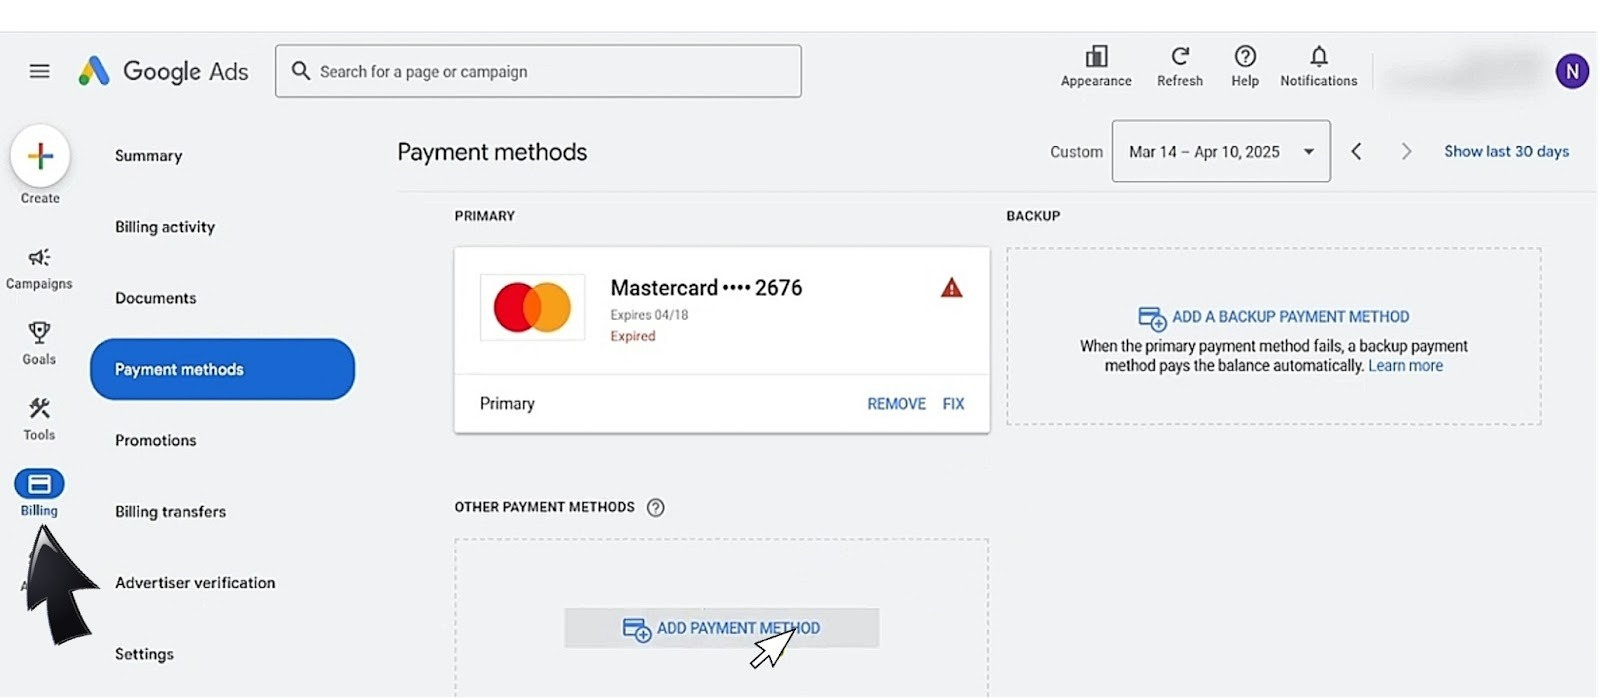
Billing Threshold
Next in this Google Ads tutorial, we'll be discussing the billing threshold. It is the maximum amount your account will be charged for your advertising costs. It is automatically deducted once your spending hits the threshold or at the end of the month, whichever comes first.

While it is possible that you may be charged slightly more than the threshold if your account accrues costs very quickly, Google allows you to set billing thresholds. Here are the steps to adjusting your billing threshold:
-
In your Billing settings, go to the “How you pay” section, then click on “Edit threshold”.
-
Set your payment threshold at the recommended amount or any other amount up to the recommended value. (You can also select “Opt out of automatic threshold increases” to manually adjust your threshold, but this feature might not be available in all Google Ads accounts.)
-
When you're done, click “Save”.
Install Tags and Conversions
To make sure you can actually track conversions on your website, you need to install Google Tag. It is a piece of code that tells Google Ads what people do after clicking your ad. For example, it can track if someone makes a purchase or completes a form on your website.
Google Tag Install (CMS, GTM, custom)
You can install Google Tag on your website through a Content Management System (CMS) like WordPress, or by using Google Tag Manager (GTM) if you want more flexibility. For a beginner, here's a step by step Google Tag setup guide:
-
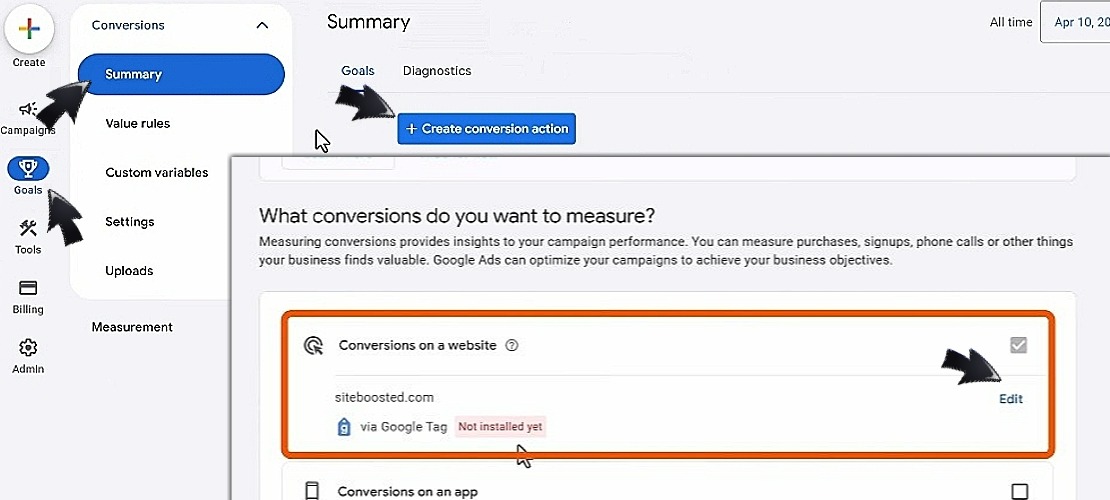
Go to the “Goals” menu.
-
Click on “Summary”.
-
Scroll down a bit and find “Create conversions action”.
-
Within the option of “Conversions on a website”, click on “Add URL” and type-in the URL of the website you want to measure conversions on.
-
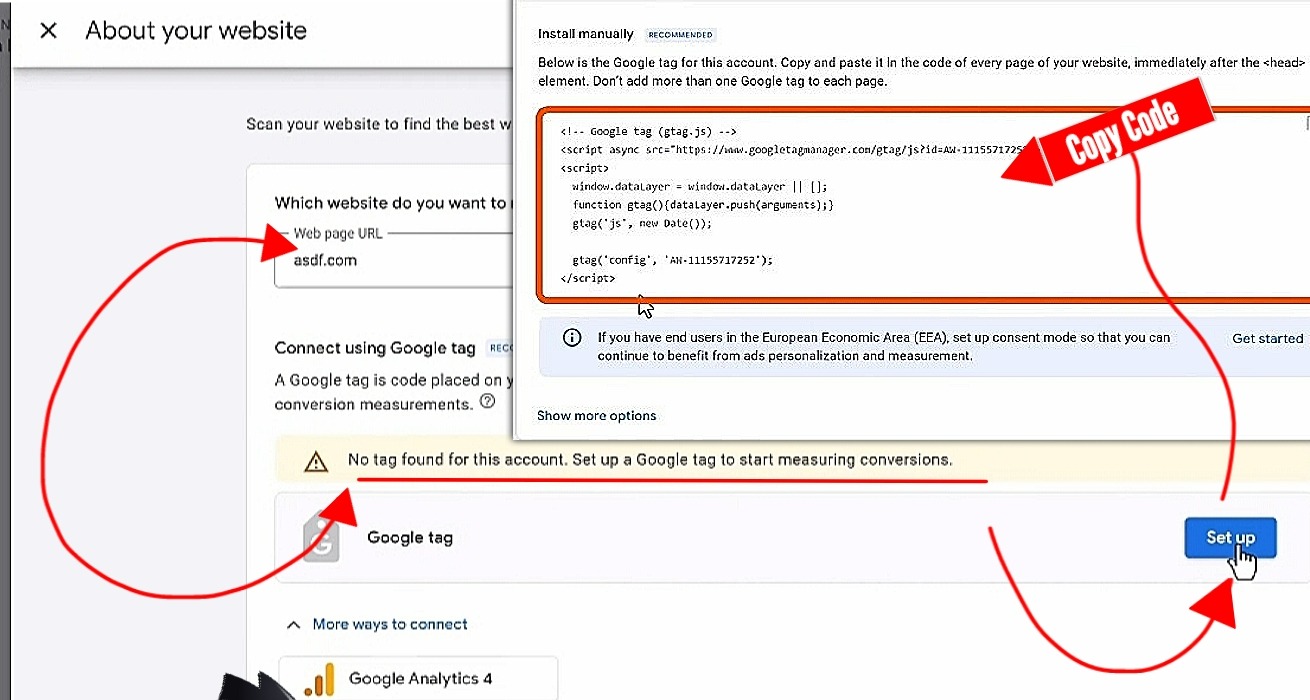
Click on “Scan” to get the prompt to set up a Google tag, click on “Set up” and copy the Google tag code.
The next actions are for putting the code in your website through the content Management System (CMS) used in creating it. If you are using WordPress, which is the most common, it has a pre-installed plugin called WPCode.
-
Navigate to the plugin option on WordPress.
-
Select “WPCode”.
-
Select “Code Snippets” from the dropdown options.
-
Click on “Header & Footer” from the side options displayed.
-
Paste the copied code into the “Header” section and click “Save changes”.

Now, go back to your Google Ads tab and type-in the URL of your landing page and click “Test Installation”. The tag should have already been installed. Just go ahead and click on “Done”, and then “Continue”.
Next Step: Create Conversion
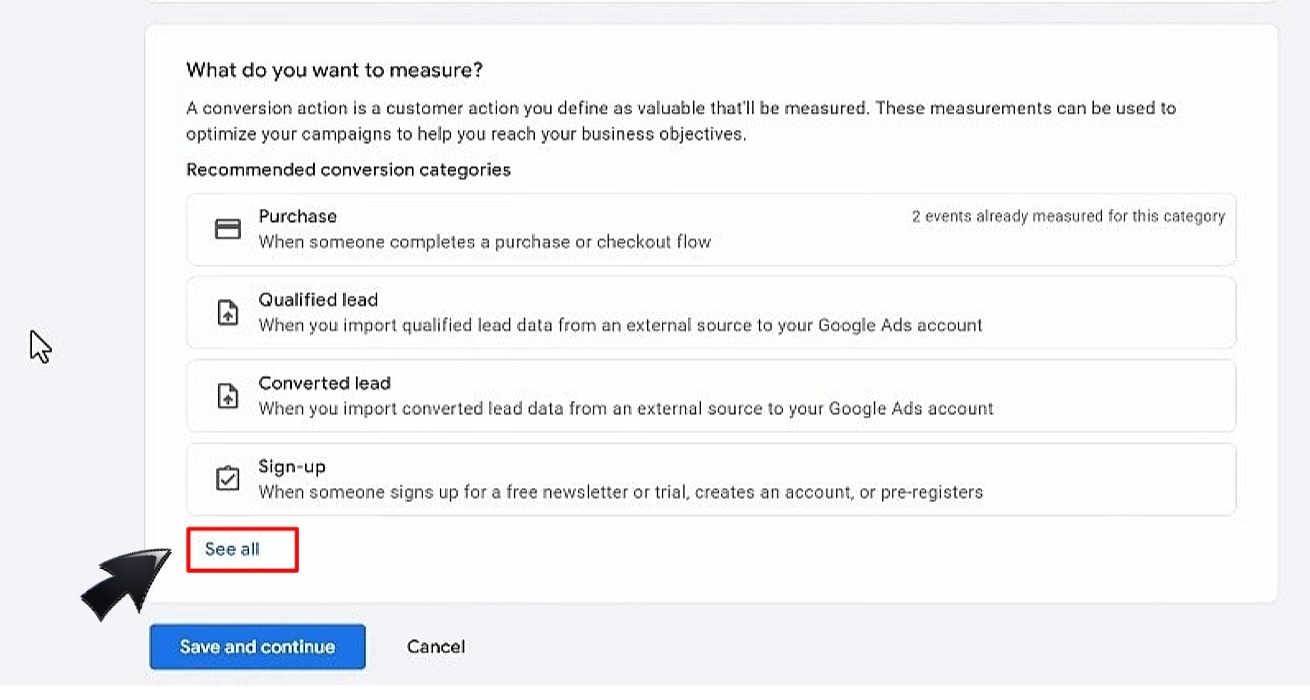
You now have to choose the conversion categories you want to track on your website. All available options will show when you click on “See all”. You can select as many categories as you want to track and follow the next steps:
-
Select “Setup” under whichever category you have selected.
-
Go to “Create manual event” and enter a name for the event. For example, if you are setting up purchase tracking, you can call the event “Purchase Product” because it is going to be triggered when someone buys something on your website.
-
Click on “Use event”.
From here, you can click on “Settings” to make any necessary adjustments. Save and continue your setup, then select “See event codes” and copy the event code that is displayed.
To paste this event code, you will be using the same procedure we used for the Google Tag code in your CMS earlier, only that it will be pasted in the header of a specific webpage where the conversion is taking place.
For example, if your goal is sales, you will paste it on the "Thank you” confirmation page where customers will land after making a purchase. After that, click on “Finish” and l the tracking begin!
GA4 Events and Conversions Mapping
Advertisers connect their accounts with Google Analytics 4 (GA4). This lets you set up conversion events (like “Add to Cart” or “Sign Up”) and then import them into Google Ads. Follow the next set of instructions for conversion tracking Google Ads GA4 account.
-
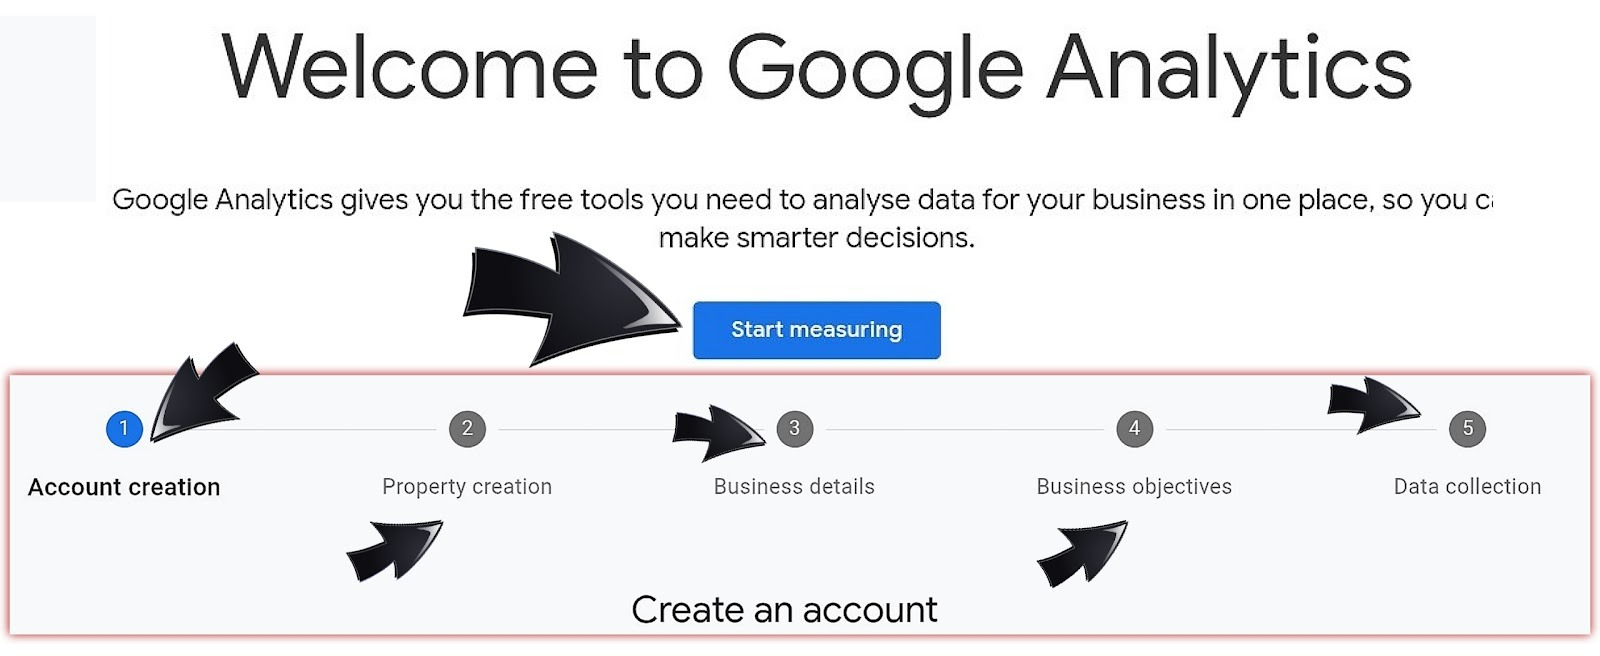
On the Google Analytics webpage, click “Start Measuring”, provide an account name and complete the data-sharing settings.
-
Proceed to add a property to the account, enter a (e.g. "My Business website"), then select the reporting time zone and currency.
-
Follow the prompts and keep clicking on “Next”, accept the Analytics Terms of Service and the Data Processing Amendment and click on "Create”.
-
Continue to data collection, then click on “Add stream” to select iOS app, Android app, or Web. If you select “Web”, enter the URL of your primary website, and a stream name. Then click on “Create stream”.
The next step is to link it to your Google Ads for conversion mapping. Follow the next instructions to create Google Analytics 4 property links to Google Ads:
-
Go to “Admin”, then select “Product links” and click “Google Ads links”.
-
Click on “Link", and select “Choose Google Ads accounts”, then click on the Google Ads accounts you want to link.
-
Confirm and then enable auto-tagging.
-
Click on “Next”, review your settings, and submit.
Testing and validation
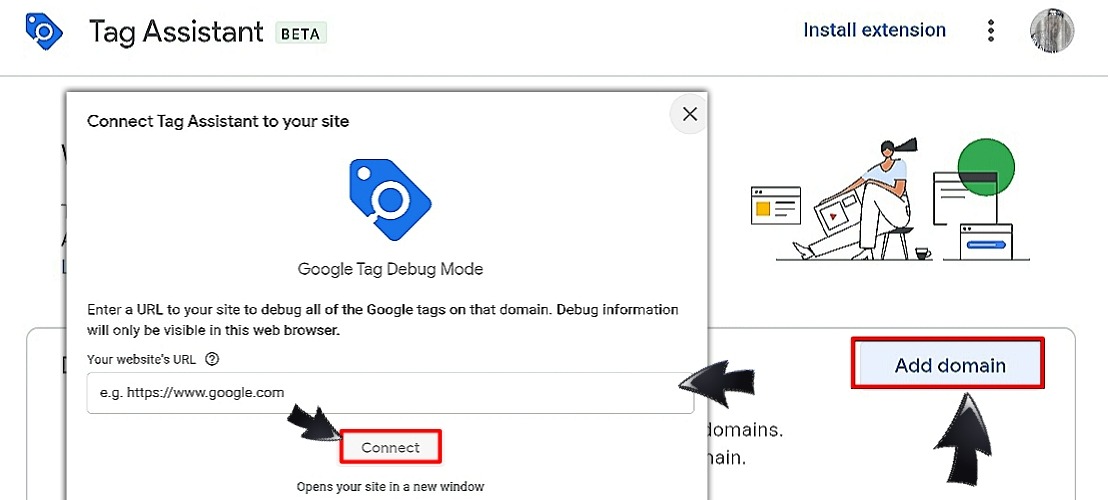
This Google Ads tutorial will be incomplete without showing you how to test and validate your installed tag. You can easily do this with Google Tag Assistant. Let's get to it.
-
Launch the Tag Assistant window and click on “Add Domain”. Enter the URL of the webpage you want to test (it has to be a page you have created a conversion for earlier.
-
Click on “Connect,” and it will open the website in debug mode. This shows that the Tag Assistant is connected.
-
Minimize the page and go back to the Tag Assistant window to click in “Continue”. You should see the debug manager now and select the Google Analytics bar.
-
Return to the website (still in debug mode) and perform the actions that lead to the conversion you are testing (whether completing a form or making a purchase), and ensure that you get to the “Thank you” page that confirms the completion of the conversion action.
(While doing this, ensure that relevant cookie consent banners are accepted and ad blockers are deactivated for your domain)
Now minimize the website and go back to Tag Assistant. Information about your website should be displayed on the left side of the window.
Click on the “Thank you” page to see if Google Ads conversion tracking tag is fired on the appropriate conversion page.
If it fired, you will see the exact tags displayed in terms of sales, page views or user engagement.
Enhanced Conversions and Consent Mode v2
With an enhanced conversion setup, Google can capture extra details like email addresses and phone numbers from converted leads to improve tracking accuracy without violating privacy rules. This is especially important now that Consent Mode v2 is required in the U.S. for compliance with privacy laws. This setting is accessible in Google Tag.
Research: Keywords and Audiences
Before you launch a campaign, you should do some quick research to discover demand and intent. You need to know what people are actually searching for. This is where keyword research comes in. Keywords are the words or phrases that your potential customers search for. Targeting the right keywords will make your ads show up for the right audience at the right time.
To achieve this, access the Keyword Planner in your Google Ads account from the Tools icon. Click on “Discover new keywords” and you will be able to choose one of the displayed options to get started. Enter words or phrases related to your business, and then enter your website URL to get keyword ideas based on its content.
After that, click on “Get results”. Then you will be able to review the data provided (Average monthly searches, Competition level, and Low and high bid ranges). Then you need to remove irrelevant keywords such as brand names or the word "free". Then select the keywords you want to use and add them to a keyword plan.
Build and Maintain a Negative Keywords List
In contrast to finding the right keywords, you should also build a negative keywords list. These are the words you don’t want your ads to show for. For instance, if you sell premium cakes, you might add “free” or “cheap” as negative keywords so you don’t waste money on clicks from people who are not your target customers. You will be able to do this in the “Exclusion list” under Campaigns.
Audience Signals and Remarketing Lists
Google Ads allows you to target people based on their interests and interactions with your site. You can use audience signals to guide Google’s automation, or create remarketing lists to reach people who already visited your site but didn’t convert. Your campaigns perform better when you apply smart keyword choices with the right audiences.
Campaign Types in 2025: When to Use Which
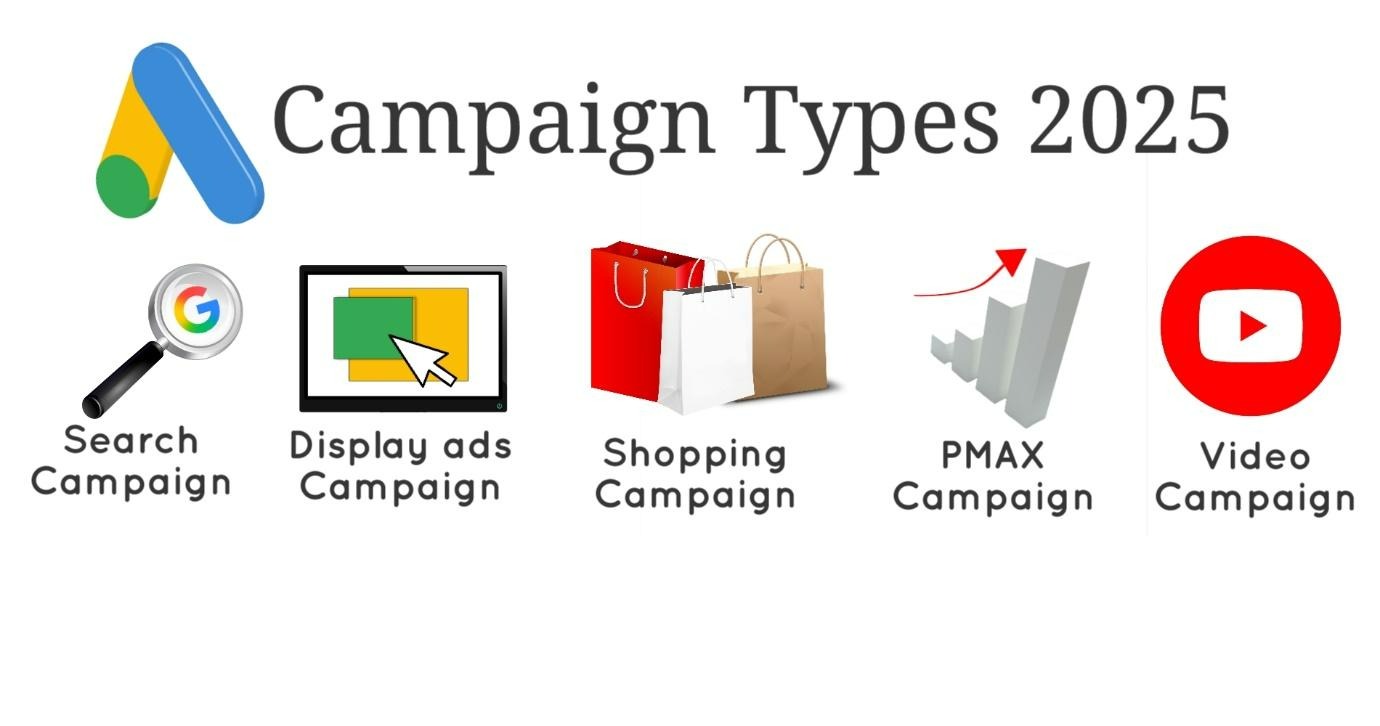
Ad campaigns are used to organize categories of products or services that you offer. Your Google Ads account can run many ad campaigns at the same time. Each campaign consists of one or more ad groups with the same settings. In 2025, Google Ads offers up to 10 types of campaigns, which are like different tools in a toolbox. In this section, we will be looking at 5 of them that a beginner can use.
Search vs Performance Max vs Demand Gen vs Video vs Display.
-
Search Campaigns: These are the classic text ads that show up when someone searches on Google. They are good for securing people who are actively looking for what you offer.
-
Performance Max Campaigns (PMAX): This newer type uses Google’s automation to run ads across Search, YouTube, Display, Gmail, and even Shopping. It is good for shopping ads setup 2025 because it pulls in product feeds from Google Merchant Center.
-
Demand Gen Campaigns: For reaching people fast on Gmail and Discover. A demand gen campaign tutorial would show you how to build awareness and spark interest before someone is ready to buy.
-
Video or YouTube Ads: If you want to show product demos or customer testimonials, YouTube ads basics will visually connect you with audiences.
-
Display Ads: These are ads that look like a banner, they appear on websites across the internet. They work well for remarketing. Following a few display ads tips can help you design visuals that get audience attention without being annoying.
Build Your First Search Campaign
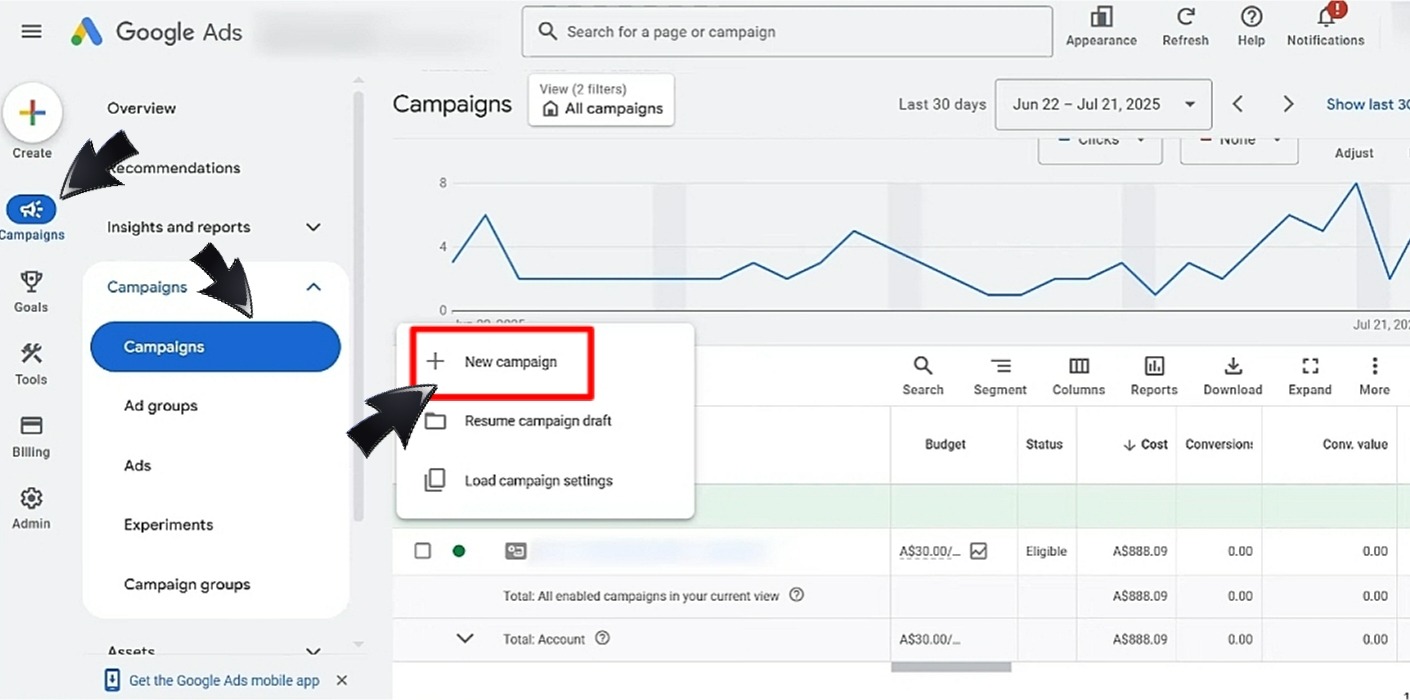
To launch a search campaign on Google Ads, click on the Campaigns Icon and select “Campaigns”. There is a “+” icon to create a new campaign. Choose your goal (Sales, Leads, or Website traffic) and select “Search” under the available types. From there, you can add more information about your business and click on “Continue” to name your Campaign and it's all an easy ride till your ad is created.
When setting up a search campaign, think about the structure. Google Ads works best when your campaigns are organized. One approach is STAG (Single Theme Ad Groups), while another is SKAG (Single Keyword Ad Groups).
STAG vs SKAG
SKAG creates separate ad groups for every keyword, making them more relevant to your ad and landing page but requiring more time and effort. STAG on the other hand groups closely related keywords into one ad group, making it easier to manage. For example, in a campaign for Luxury watches, SKAG structure might have separate ad groups for “Men’s Luxury watches” and “Female Luxury watches”, while STAG structure would put both keywords in one ad group.
The Pros and Cons of both structures:
|
Pros |
Cons |
|
|
STAG |
Easier for beginners; Fast to set up and manage |
Gives less control; Focus on a broad theme; Lower conversion rates |
|
SKAG |
Gives more control; Precise and accurate; More click-through and conversion rates |
Takes more time to manage; Targets just one keyword; Difficult to scale |
Match Type Strategy and Search Terms Control
When setting up your ad groups under a campaign, you have to choose a keyword match type to control the searches that will trigger your ads. You can use choose from the following keyword match types 2025:
-
Broad match: shows your ad for related searches that appeal to a wider audience.
-
Phrase match: shows your ad when the search includes your phrase.
-
Exact match: shows your ad only for the exact keyword.
Responsive Search Ads and Required Assets
Google now uses RSAs, where you provide multiple headlines and descriptions, and Google automatically tests combinations to find what works best.
Responsive search ads examples: you might write one headline about “Affordable Gym Memberships” and another about “24/7 Fitness Access.” Google will mix and match to see which gets the most clicks.
To create an RSA, navigate to “Ads” under Campaigns, then select “Responsive search ad” when you click on the “+” icon. You will then enter the URL of the landing page and the display path text. A preview of your ad will appear to the right, then you will need to enter a minimum of 3 headlines (but you can enter up to 15). Now proceed to type-in your descriptions (A minimum of 2, and a maximum of 4 descriptions is required). Click on “Save” to create your RSA.
Editorial and Policy Compliance
There are some strict rules about what you say in ads. Be sure to follow U.S. advertising rules by not making false claims, and ensuring that your landing page matches your ad. We'll discuss more on these later.
Build Your First Performance Max Campaign
Similar to the procedure for creating a search campaign as discussed, you can create a PMAX campaign by selecting “Performance Max” instead of “Search”.
3 things are required to set up Performance Max setup: feeds, assets, and audience signals. You need to first connect your product feeds through Google Merchant Center, and then upload assets like headlines and graphics. Google will then use these to create ads that are suitable for each platform. For example, the same campaign could show a text ad on Search, a video ad on YouTube, and a shopping ad in Google Shopping results.
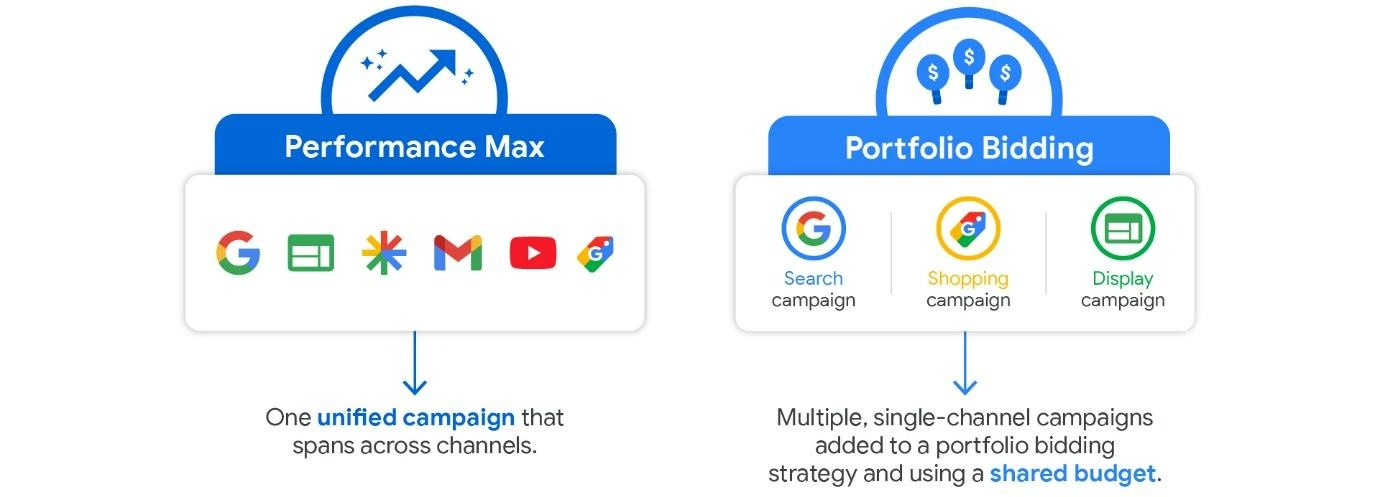
The biggest advantage of PMAX is the use of audience signals and offline conversions. You can tell Google who your ideal customers are (like people on your email list), and it will use that data to find more people like them. You can also set value rules, they optimize the system for the conversions that matter most to your business.
Bidding and Budgeting
In your campaign settings, you have to decide how much to spend and how Google should use your budget. This is where you apply bidding strategies. Google Ads offers the following options in 2025:
-
Maximize Conversions (Max Conv): This automatically adjusts your bids to get you all possible conversions within your budget.
-
Target CPA (tCPA): You set the average cost you’re willing to pay for a conversion, and Google works to hit that target.
-
Target ROAS (tROAS): it adjusts bids to reach the return you want on your ad spend (for example, $5 in sales for every $1 spent).
If you’re just starting out, Max Conv is often the simplest. As you collect more data, you can move to tCPA or tROAS for more control.
Budgeting and Budget Pacing on Google Ads
Next, think about your budget. This is the average amount you are willing to spend on a campaign per day. You can also use shared budgets if you want multiple campaigns to pull from the same budget.
Budget pacing Google Ads has to do with how your budget is spread within the course of one month. If your budget is $5 per day, your monthly spending is supposed to be $5×30.4 = $152, your pacing settings will now determine how Google spends your $152 within the month. You can always configure your budget under “Campaigns”, and on top of the “Ad groups” page.
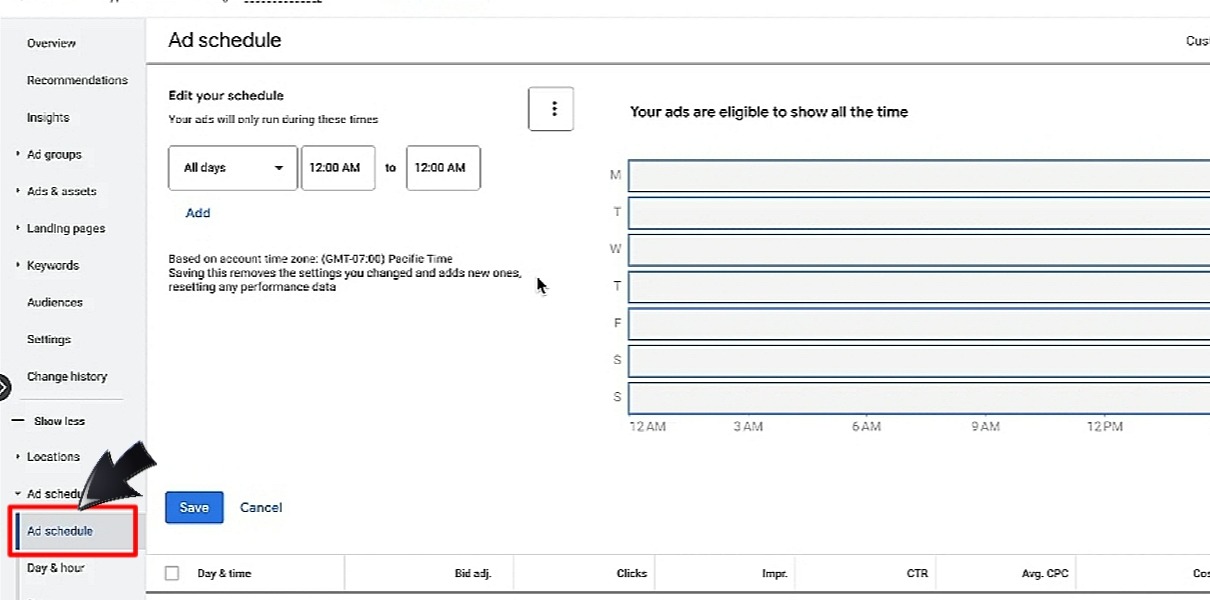
Ad scheduling and geo targeting for the USA
You can set an ad schedule to display ads only during the hours that your customers are mostly active. For example, a local restaurant should run ads around lunch and dinner. Also, geo targeting USA settings let your ads show in specific cities, states, or regions, which is ideal for businesses that serve a local area.
Optimize and Scale
Once your campaigns are running, you keep making them better over time. Optimization is about looking at what is working and fixing what is not working.
First, you need to mine search terms report, and expand coverage. This shows the exact words people typed before clicking your ad. If you see new, valuable keywords, add them to your campaign. If you see irrelevant ones, add them to your negative keywords list to save money. To do this, navigate to “Insights and reports” under Campaigns and there you will find “Search terms”.
Quality Score improvement tips
Remember how we talked about Ad Rank and Quality Score earlier? Google looks at your expected CTR, your ad relevance and your landing page experience. The higher your Quality Score, the less you’ll pay per click, and the better your ad positions will be.
Improving your Quality Score begins with the specificity of your keywords and the strict maintenance of negative keywords. Ensure that your landing page experience is good, both in terms of relevance to your ad, and in terms of the loading speed. You have to optimize the page for easy navigation on mobile phones and you don't forget to give users discounts if your ads say so.
Lastly, If one campaign is performing well, you can increase the budget or expand to new locations with geo-targeting USA settings. Scaling doesn’t mean spending wildly; it means carefully reinvesting in what’s already working.
A/B Test Ads and Assets
You can test different versions of your ads in order to improve performance. The idea is to create two versions of an ad. You can change something from the headline or call-to-action and then see which one performs better. These small tests can amount to improvements in clicks and conversions.
Don’t forget to test your landing page UX and Core Web Vitals too. Leads might not convert if your landing page is slow or confusing. Google pays close attention to Core Web Vitals like LCP (Largest Contentful Paint), INP (Interaction to Next Paint), and CLS (Cumulative Layout Shift). They measure the stability and responsiveness of your page. A smooth landing page experience helps with conversions and boosts your Quality Score.
Brand Safety, Placements, and Exclusions
As an advertiser, you must look out for the protection of your brand while trying to get visibility. With the use of exclusions, you control where your YouTube and display ads are placed.
You can prevent your ads from showing up on sites or videos that do not befit your brand, or exclude certain labels from the types of content your ads are displayed on. This ensures that your ads are shown to the right audience. Exclusions can be configured under Display campaigns, Audience exclusions for targeting, and keyword exclusion lists under the Shared library.
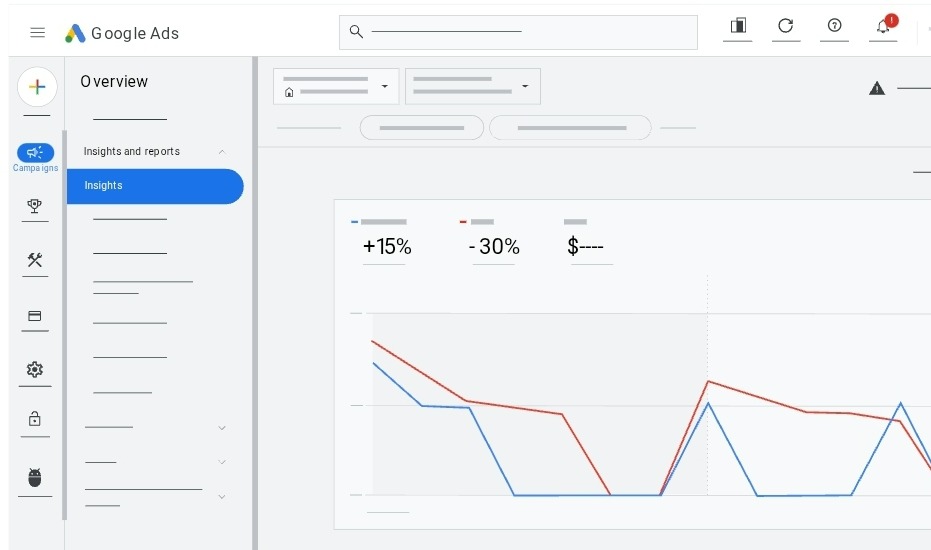
Reporting and Insights
Google Ads gives you plenty of reports to track results. You can access these when you click on “Insights and reports” under “Campaigns”. The most important ones show clicks, impressions, CTR and conversions.
Key Reports in Google Ads
GA4 views lets you see what people do after they click your ad. You can also do ROAS tracking to see how much revenue your ads are generating compared to what you’re spending.
Another useful feature is attribution reporting. Google Ads can show you the full journey of a customer from the first ad they saw to the final purchase. This helps you understand which campaigns yield value, not just clicks. For this, go to Tools and settings, then click on “Measurement”, and there you can select “Attribution”.
Troubleshooting
Things don’t always go smoothly sometimes, even with the best setup. Your ads might get disapproved due to policy reasons.
Disapprovals and Appeals
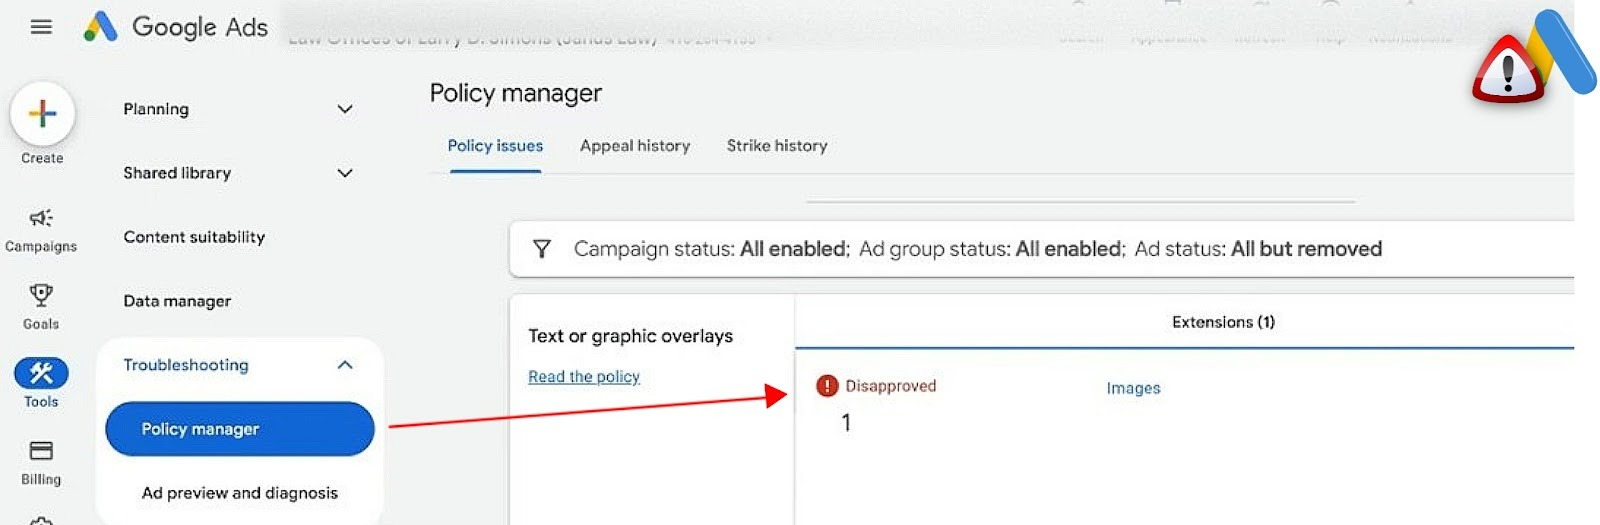
Your account could be disapproved because of restricted content or texts that violate some rules. Don’t panic if your account faces a suspension, Google provides an appeals process where you can submit additional information or documents to prove compliance.
To appeal policy decisions on Google ads, click on “Troubleshooting” under settings, select “Policy Manager” and you will find a tab that displays policy issues. Click on “Appeal”, then there are options to either “Dispute decision” or select “Made changes to comply with policy”. Click on “Submit” when you're done, and your appeal will be reviewed.
Another common issue is being limited by budget. This means your ads could show more often, but your daily budget is holding them back. The fix is either to raise your budget or focus on fewer campaigns.
You might also see problems like low volume and traffic diagnosis. It is usually because keywords are too narrow or your bids are too low.
Compliance and Privacy in the USA
The FTC (Federal Trade Commission) ensures that ads are not misleading. FTC claims and endorsements policies demand that if you make claims, you need to back them up. For example, you cannot say “Best dentist in America” unless you can prove it.
Regarding privacy laws in California, CCPA/CPRA signals and opt-out links are provided for data tracking, and Google Ads requires you to respect those signals. If you’re in healthcare, HIPAA rules mean you cannot use ads to target or share sensitive patient information. And if you use call ads or text message campaigns, there are TCPA rules for call assets and leads.
Checklists
The following checklists will make things easier before and after launching your campaigns:
Pre-launch Checklist
-
Define your goals (sales, leads, traffic).
-
Set up conversion tracking with GA4 and enhanced conversions.
-
Add negative keywords to avoid the wrong traffic.
-
Compliance with all regulations.
-
Inquire about ad schedule best times USA.
-
Test your landing page.
First 7 Days Optimization Checklist
-
Review search terms and add new negatives.
-
Check CTR and CPC to see if your ads are competitive.
-
Make sure conversions are tracking correctly.
-
Adjust bids or budgets if you’re limited by budget.
Monthly Audit Checklist
-
Review Quality Score and look for ways to improve.
-
Test new ad copy or assets (A/B testing).
-
Check attribution reports in GA4 for full customer journeys.
-
Scale up campaigns that are hitting your CPA or ROAS goals.
Conclusion and Key Takeaways
Google Ads in 2025 is all about starting with clear goals and setting up your account correctly. From there, you can study the different types of campaigns and choose the ones that best fit your business.
You should start with a search campaign and test your ads. Then as you get more comfortable, you can scale up with smart bidding strategies and refine your targeting with audiences and negative keywords.
It is important to remember that your success in Google Ads is tied to continuous improvement. Use reports to learn what is working and stay compliant with advertising rules in the United States. You can rely on Google Ads to grow your business if you follow the ad assets best practices 2025 and quality score improvement tips in this article.
FAQ
Q: What documents are required for Google Ads advertiser verification in the US?
A: You need a driver’s license or a passport for identification. Then you also need business documents, and proof of address may also be needed.
Q: How long does Google Ads verification take in 2025?
A: Google Ads usually take 3 to 5 business days as of 2025.
Q: Why was my Google Ads verification rejected and how do I fix it?
A: The rejection could be due to expired documents. You can fix it by resubmitting valid details.
Q: Do agencies need to verify each client under an MCC?
A: Yes. Every account must be verified.
Q: What is budget pacing for Google Ads?
A: As mentioned in this Google Ads tutorial, budget pacing is how your daily or monthly budget is spread across time to avoid overspending or underspending.